
Let’s talk about something important—keeping your love doll clean. Trust me, it’s not just about appearances. Regular cleaning keeps you safe from harmful bacteria and ensures your doll stays in top condition. Neglecting hygiene? That’s a fast track to wear and tear. Plus, let’s be real, no one wants to deal with unpleasant odors or damaged materials. Whether it’s wiping down the body or cleaning the love holes, a little effort goes a long way. You’ll thank yourself later for the added satisfaction and peace of mind.
Key Takeaways
-
Cleaning your love doll often stops harmful germs and keeps you healthy. Wash it after each use for the best care.
-
Use mild soap with antibacterial properties and soft tools to clean. Stay away from strong chemicals that might harm the doll.
-
After cleaning, use renewal powder to keep the doll’s skin soft. This also stops it from feeling sticky.
-
Check your doll regularly for any damage or small cracks. Fixing small problems early can save money on big repairs.
-
Keep your doll in a cool, dry spot, away from sunlight. Storing it properly helps it last longer and stay in good shape.
Why Hygiene Matters
Health Risks of Neglecting Cleaning
Let’s get real—skipping proper cleaning can lead to some nasty consequences. Bacteria and mold thrive in moist, unclean environments. If you don’t clean your love doll regularly, you’re inviting infections, skin irritations, or worse. I’ve seen people underestimate this, thinking, “It’s just a doll.” But trust me, the risks are very real.
Pro Tip: Always clean your doll after every use. It’s not just about hygiene; it’s about your health too.
Neglecting cleaning can also lead to unpleasant odors. Once those smells set in, they’re tough to get rid of. And let’s not forget—dirty surfaces can damage the material over time. That’s a lose-lose situation for everyone.
Benefits of Regular Hygiene Practices
On the flip side, keeping your doll clean has some amazing perks. First, it keeps you safe. No bacteria, no infections, no worries. Second, it makes your doll look and feel brand new. Who doesn’t love that fresh, clean feeling?
Regular cleaning also boosts your confidence. You’ll enjoy your time with your doll more when you know it’s spotless. Plus, it’s easier to maintain the doll’s quality when you clean it often.
Fun Fact: A well-maintained doll can last years longer than one that’s neglected. That’s a win for your wallet too!
Longevity and Performance Impact
Here’s the deal: love dolls aren’t cheap. If you want yours to last, hygiene is non-negotiable. Dirt and grime can weaken the material, causing cracks or tears. Over time, this affects the doll’s performance and appearance.
Think of cleaning as an investment. A little effort now saves you from costly repairs—or worse, replacements—later. When you take care of your doll, it stays soft, smooth, and ready for action. That’s what I call a smart move.
Step-by-Step Cleaning Guide
Preparing for Cleaning
Before diving into the cleaning process, preparation is key. Trust me, skipping this step can make things messy and less effective. Here’s how I get ready:
-
Set up a clean workspace: I always choose a well-lit area with enough space to move around. A clutter-free environment makes cleaning easier and safer.
-
Wash my hands: This might sound basic, but clean hands prevent transferring dirt or bacteria to the doll. I spend at least 20 seconds scrubbing with soap and water.
-
Gather supplies: I make sure all my cleaning tools are within reach. This saves time and keeps the process smooth.
Pro Tip: If you’re using cleaning solutions, test them on a small, hidden area of the doll first. This avoids any surprises like discoloration or damage.
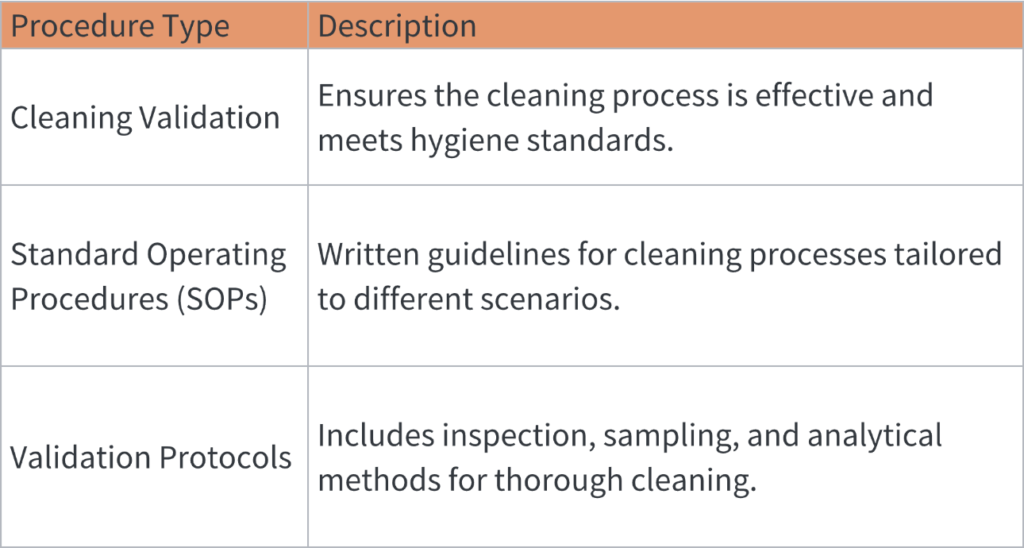
Here’s a quick table to summarize the preparation procedures that enhance cleaning effectiveness:
Taking these steps ensures the cleaning process starts on the right foot.
Essential Cleaning Tools
Having the right tools makes all the difference. Over the years, I’ve learned that improvising with random household items doesn’t cut it. Here’s my go-to list:
-
Soft sponges or microfiber cloths: These are gentle on the doll’s skin and prevent scratches.
-
Antibacterial soap: I use mild, unscented soap to avoid irritating the material.
-
Warm water: Not too hot, not too cold—just right for effective cleaning.
-
Cotton swabs: Perfect for reaching those tricky spots.
-
Drying towels: I prefer lint-free towels to keep the doll spotless after cleaning.
Note: Avoid harsh chemicals like bleach or alcohol-based cleaners. They can damage the doll’s material and shorten its lifespan.
Having these tools ready makes the cleaning process faster and more efficient.
Cleaning the Body
Now comes the fun part—cleaning the body. I always start with the larger areas before moving to the smaller details. Here’s my step-by-step approach:
-
Wipe down the surface: Using a damp sponge or cloth, I gently clean the doll’s skin. I focus on removing dirt and oils without scrubbing too hard.
-
Pay attention to joints and creases: These areas can trap grime, so I use cotton swabs for precision cleaning.
-
Rinse thoroughly: After cleaning, I rinse the doll with warm water to remove any soap residue.
Callout: Staying hydrated is essential for humans, but for dolls, it’s all about keeping the material moisturized. Use a damp cloth instead of soaking the doll to preserve its texture.
Cleaning the body isn’t just about hygiene—it’s about maintaining the doll’s appearance and performance. A clean doll feels smoother and looks better, enhancing the overall experience.
Cleaning the Love Holes
Cleaning the love holes is one of the most important steps in maintaining your doll’s hygiene. Trust me, this isn’t a step you want to rush or skip. These areas are prone to accumulating bacteria and moisture, which can lead to unpleasant odors or even damage over time. Here’s how I handle it:
-
Start with warm water: I use warm water to rinse the love holes before applying any cleaning solution. This helps loosen any residue and makes the cleaning process smoother.
-
Use a gentle antibacterial soap: I apply a small amount of soap to a soft sponge or cloth. Then, I carefully clean the interior, making sure to reach every corner.
-
Focus on precision: For tighter spaces, I rely on cotton swabs. They’re perfect for getting into those hard-to-reach areas without damaging the material.
-
Rinse thoroughly: After cleaning, I rinse the love holes with warm water to remove all soap and residue.
Pro Tip: Avoid using sharp or abrasive tools. They can scratch or tear the material, which is a nightmare to fix.
Taking your time with this step ensures your doll stays fresh and safe for use. Plus, it keeps the material in top condition, so you won’t have to worry about wear and tear.
Rinsing and Drying Techniques
Rinsing and drying might seem straightforward, but trust me, the technique matters. I’ve learned that improper drying can lead to lingering moisture, which is a breeding ground for bacteria. Here’s how I do it:
-
Rinse with care: I use warm water to rinse the doll thoroughly, ensuring no soap or cleaning solution remains. For love holes, I gently flush them with water using a small bottle or syringe.
-
Drying is key: I always use a lint-free towel to pat the doll dry. For the love holes, I insert a clean, dry cloth and leave it for a few minutes to absorb any moisture.
Callout: Never rub the doll’s surface aggressively while drying. It’s better to pat gently to avoid damaging the material.
Here’s something interesting I’ve noticed. Studies show that drying techniques can make a huge difference in hygiene outcomes. For example:
-
Jet air dryers eliminate bacteria more effectively than other methods.
-
Rubbing hands—or in this case, surfaces—on clothing can undo the benefits of cleaning.
-
Stationary drying with warm air removes more bacteria than rubbing, which is why I avoid friction-based drying methods.
When drying the love holes, I sometimes use a small fan or a low-heat hair dryer to ensure they’re completely moisture-free. This extra step prevents bacteria from thriving and keeps the doll in pristine condition.
Post-Cleaning Care Routine
Once the cleaning and drying are done, I like to finish with a post-cleaning care routine. This step helps preserve the doll’s material and keeps it looking and feeling brand new. Here’s what I do:
-
Apply renewal powder: I use a talcum-free renewal powder to keep the doll’s skin soft and smooth. This prevents stickiness and helps maintain the texture.
-
Inspect for damage: After cleaning, I check the doll for any signs of wear or tear. Catching small issues early can save you from bigger problems later.
-
Store properly: I always store the doll in a cool, dry place. Keeping it away from direct sunlight and extreme temperatures prevents material degradation.
Note: If you’re storing the doll for a long time, consider wrapping it in a soft cloth to protect it from dust and scratches.
